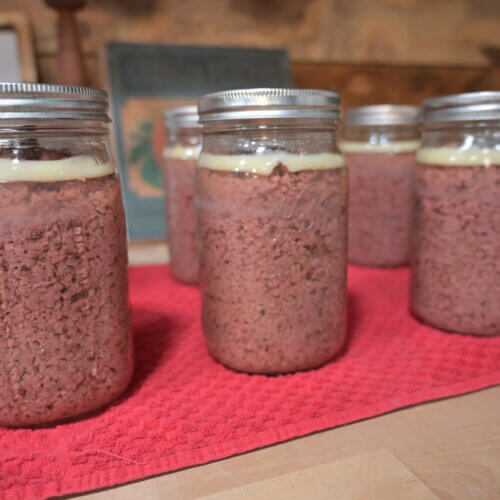
Canned Ground Beef Directions
Learn how easy it is to make canned ground beef that will sit on your pantry shelf for years. This method also works for canned ground venison, elk, bear, lamb, pork, sausage, etc. It’s so convenient to pop open a jar of canned ground beef to whip up tacos, spaghetti sauce, lasagna or to use in a casserole.
Print
Pin
Servings: 4 servings
Calories: 576kcal
Equipment
- Pressure Canner
- Large Pot
- Mason Jars and Lids
- Canning Tools
- Clean Towels
- Measuring Spoons
Ingredients
- 2 pounds ground beef
- 1 teaspoon salt
- 2 teaspoons herbs and seasonings
Instructions
- Cook up ground beef, stirring occasionally to break up any large clumps. You don’t want any clumps larger than a small meatball.
- While ground beef is cooking, prepare jars and add two inches of water to your pressure canner.
- About 10 minutes before the ground beef is fully cooked, start heating up the water in the pressure canner, make sure the canning rack is in place and add your empty jars to the canner to keep them warm. Bring the water up to a nice steam (not a boil).
- Bring the liquid you’re using to fill your jars up to a boil.
- Once your meat is fully cooked, pour off the extra fat and water. You want as little fat as possible in your canned ground beef because the fat reduces the shelf-life. Homesteading Hack: I like to pour my ground beef into a large colander and give it a quick rinse with water to get any extra fat off that I can.
- Pull out one jar at a time from the canner and fill it with ground beef, leaving a one-inch headspace.
- Use your bubble remover to tamp down the ground beef and add more meat as needed.
- Add optional salt and seasonings.
- Pour liquid into the jar, leaving one-inch headspace.
- Use the bubble remover again, by running the tool down the inside of the jar in four places, and top off with more liquid, if needed. Homesteading Hack: If you run out of broth or tomato juice when canning, you can always top the jars off with boiling water in a pinch!
- Dip a clean cloth into a small bowl of white vinegar and run it over the rim of the jars to remove any food particles or fat.
- Add the canning lid and ring and tighten to fingertip tight. This is as tight as you can tighten the band using only your thumb, pointer and middle fingers.
- Place the jar back into the canner and continue steps 6-12 until all jars are filled.
- Add the canner lid (without the weight) and get it locked into place. Gently bring the pressure canner up to pressure over medium heat (don’t be in a rush here).
- Once the canner starts to have a steady stream of steam, set the timer for 10 minutes to allow it to vent.
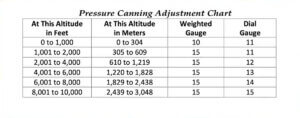
- After 10 minutes, add the canning weight and bring the pressure up to the proper level (see the Pressure Canning Adjustment Chart below).
- Depending on the type of gauge you’re using, you’ll want to get the pressure just right before you start the time. For a dial gauge you’ll be able to see where your pressure is. For a weighted gauge, you want 1-4 “jiggles” per minute to know you’re up to pressure. If you’re using a Presto-type canner, you want your gauge to do a “hula”, which means a nice slow consistent turning of the gauge. If the weight starts spinning rapidly and doing more like a “salsa” dance than a “hula”, then you’re above pressure.
- Once you hit the correct pressure, start your timer. Process quart jars for 90 minutes and pint-sized or half-pint jars for 75 minutes.
- If at any time during the canning process you drop below the ideal pressure, you need to stop your timer, get the canner back up to pressure and begin the timer from the beginning again.
- Once the timer is up, turn off the heat and allow the canner to reduce to zero pressure naturally.
- Remove the weighted gauge and let it sit for 10 more minutes.
- After the 10 minutes, remove the lid and remove the jars to a towel-lined counter where they can sit for a full 16-24 hours.
- After 24 hours, remove the bands and check the seals. If there is any grease on the outside of the jars, you can wipe them clean before storage.
Notes
Here are some tips and pointers to consider when canning ground beef:
- This canning method works for canned ground venison, elk, bear, lamb, pork, sausage, etc.
- About two pounds of raw ground beef (or other meat) fits into one quart-sized Mason jar once cooked. One pound of ground beef fits into a pint-sized jar, and a half pound of ground beef fits into a half-pint jar. Knowing this will help you have enough clean jars ready during the canning process, and enough meat ready so you can run a full canner.
- Know how many jars fit into your canner, this will help you plan how much ground beef to cook up at once. My canner holds 7 quart-sized jars. Since two pounds of ground beef fit into one quart-sized jar, I need 14 pounds of ground beef cooked at once.
- Try to think about how much ground beef your family will eat per meal and can that amount in each jar.
- Keep your cooked ground beef hot prior to canning.
- Though it’s not pretty, boiling your ground beef is a quick and easy way to cook large portions of beef at a time. Since we’re canning the beef in liquid anyway, the texture will be the same.
- It is important to remove the excess fat from the meat after it has been cooked but before you put it into your jars to can. Either pour off the excess fat or rinse it off of the meat.
Nutrition
Calories: 576kcal | Protein: 39g | Fat: 45g | Saturated Fat: 17g | Polyunsaturated Fat: 1g | Monounsaturated Fat: 20g | Trans Fat: 3g | Cholesterol: 161mg | Sodium: 733mg | Potassium: 612mg | Calcium: 41mg | Iron: 4mg
Tried this recipe?We want to see! Tag @homesteadingfamily on Instagram.