If you've wanted to grow and store more food but don't yet have a root cellar, this blog post and podcast episode is for you! Learn these root cellaring techniques to store vegetables without a root cellar from Sam Knapp.
We like to discuss root cellaring techniques a lot around here because in our "market garden," we're growing the crops our family consumes throughout the fall, winter and early spring. We don't yet have a proper root cellar, but you can check out the progress of our in-ground root cellar build here.
Then, check out our other post on root cellaring for beginners to familiarize yourself with various root cellaring methods. Right now we rely heavily on "root cellaring methods" because we're working with non-ideal conditions.

About Sam
Sam Knapp grew up in the Northwoods of Wisconsin as an avid gardener but with little exposure to farm life. After earning degrees in physics and chemistry and starting down the career path of engineering, Sam caught the farming bug while working on a research farm in Sweden.
He worked on vegetable farms in Sweden, Alaska, Michigan, and Wisconsin before starting his own Root Cellar Farm in the Upper Peninsula of Michigan to earn extra income while completing a master’s degree in plant ecology.
In 2020, Sam moved outside of Fairbanks, Alaska, where he built Offbeet Farm from scratch in a patch of boreal forest. Offbeet Farm provides vegetables to the Fairbanks community during the long, dark Alaskan winters through a winter-only community-supported agriculture (CSA) program and sales to local groceries.
Sam authored Beyond the Root Cellar to encourage more farmers and gardeners through the learning curve of long-term vegetable storage and thereby improve local food economies and security.

Best Crops for Long-Term Storage
It may come as no surprise what vegetables do best for long-term storage. They're the common crops that like to be cold and damp:
- Beets
- Carrots
- Turnips
- Rutabagas
- Parsnips
- Cabbage
However, there's a whole lot more than just these commonly known crops:
- Daikon Radishes
- Sunchokes
- Brussels Sprouts
- Kale
- Riddichio
From there, you've got crops that do well for long-term storage in cooler and dryer conditions such as:
- Potatoes
- Onions
- Shallots
- Garlic
- Winter Squash
- Sweet Potatoes
When choosing crops to grow, specifically for storage purposes, look in your seed catalog for varieties that are specifically listed as good storers.
If crops aren't listed as "storage" varieties, then look for crops that have longer days to maturity. Most storage crops have a longer growing time than something that won't store as well.

Why Harvesting Time is So Important
Harvest timing is tightly related to planting timing. The crops you're pulling out of the ground have to be mature if you want to store them. For many crops, the actual maturity stage they're at doesn't necessarily matter (such as the size of your carrots or potatoes).
However, for other crops, it does matter when you harvest them, such as garlic, onions, winter squash and pumpkins. If you harvest these crops too early they will not store well. You may want to check out our posts on garden planning, how to use a vegetable garden planner, and how to read seed packets.
Unlike apples, which can be harvested early and continue to ripen off the vine, with pumpkins and winter squash, you get what you pick. They will no longer continue to ripen, so you want to make sure they're fully mature at the time of harvest.
Sam shared a very important truth that we should all be aware of: Crops will never get better in storage. Once they're harvested, they're on a steady decline, and we're just managing the deterioration. So you want to harvest and start with the very best crops that you can.
There are signs for various crops that will tell you when they're mature and ready for harvest:
- Pumpkins & Winter Squash - Pumpkins, for example, generally get a shiny, almost waxy luster when they're mature and ready for harvest. However, in the south, where there can be sun-scald issues if crops aren't harvested in time, you can also look for the tiny hairs that cover the crop to disappear. This is a sign that the crop is ready for harvest. It's also important to note that winter squash and pumpkins can get chilling disease if left out in temperatures below 50°F for an extended period of time (consider the mean temperature, not necessarily the high or low). Chilling disease doesn't show up immediately, it's a bit of a cumulative disease.
- Onions - Many of us wait until the onion tops fall over before we harvest them. However, Sam shared that you can pinch at the base of the onion stem, and if it gives (like it's hollow), it has reached maturation, and you can begin harvesting. In wetter climates, if you wait until the tops fall over, onions can be susceptible to fungal rot coming in from the neck down.
- Root Crops - Root crops are generally one of the last crops we harvest. They can last in the ground, even when temperatures dip to freezing. Allowing them to go through a mild freeze actually helps improve the flavor because the cold temperatures convert the starches into sugars. The technical term for this is cold acclimation. If temperatures are going to dip much colder than 28°F, it might be a good idea to either add some insulation/mulch or harvest them. If you want your potatoes to cure in the ground, be sure the tops have died back for at least a couple of weeks prior to harvesting. You can mimic this by torching or whacking off the potato vines. This signals the potato to start firming up the skin for storage.
- Homesteading Hack - If you harvest crops that don't look that great, set those aside and don't store them with the crops that look good for long-term storage. You know the saying, "One bad apple spoils the whole bunch." This is true of many crops, and you don't want to introduce disease to your otherwise healthy crops.

Preparing Crops for Best Storage
Beyond timing the harvest of various crops, there are also great tips for how to handle the crops once they're harvested (before storage) to get the best results:
- Be Gentle - When harvesting crops, it's super important to handle them gently. Pay attention to your fingernails; make sure you're not nicking the skins of the veggies. Try to place the crops gently and not drop or toss them to avoid bruising.
- Washing - There's a long-standing debate about whether to wash crops before or after storage. Sam says this comes down to the storage conditions you're able to achieve. If you can get storage conditions around 32°F, you can wash crops prior to storage. If you're storing them in warmer conditions than this, don't wash them until you're ready to use them.
- Curing Onions, Shallots & Garlic - Curing is the process that protects the crop from moisture loss. Whether onions, shallots and garlic, or winter squashes and pumpkins, they all benefit from curing time. For onions, shallots and garlic, moisture is your enemy. If you're curing them outdoors, where they might get rained on or be exposed to high humidity, you will want to bring them indoors to cure where it's more temperature and humidity-controlled. Warm and dry is ideal.
- Curing Potatoes, Tubers & Sweet Potatoes - For crops such as potatoes, carrots, beets, turnips, etc., the curing process is more about wound healing. Sam says many farmers will cure these crops in the same location where they'll be storing them for the long term. The goal with potatoes, especially, is to get them out of the sun immediately after harvest. So, cure them in a dark, cool location (ideally around 57°F). See the tip above for curing potatoes in the ground.
- Brassicas - These are some of the easiest crops to store because no specific curing step is needed prior to storage. The key is getting them as cool as possible as quickly as possible after harvest. Commercial farmers rely on commercial refrigeration, such as cool bots. But if you have a spare refrigerator that you can cool them down quickly, this is great.
Be sure to plan ahead! If you have large quantities of crops to harvest, you'll want to keep an eye on the weather and plan your harvest days. Sam recommends checking out the National Weather Service page's daily/monthly average mean temperatures for your area (meaning the average mean of the high and low for each day). If you go to that website, you can search for a city near you to see your average normal high and low temperatures.

Storage Tips
It's great to be able to create ideal storage conditions for your crops. Though we don't all have these ideal conditions. So what can we do if we're working with what we've got?
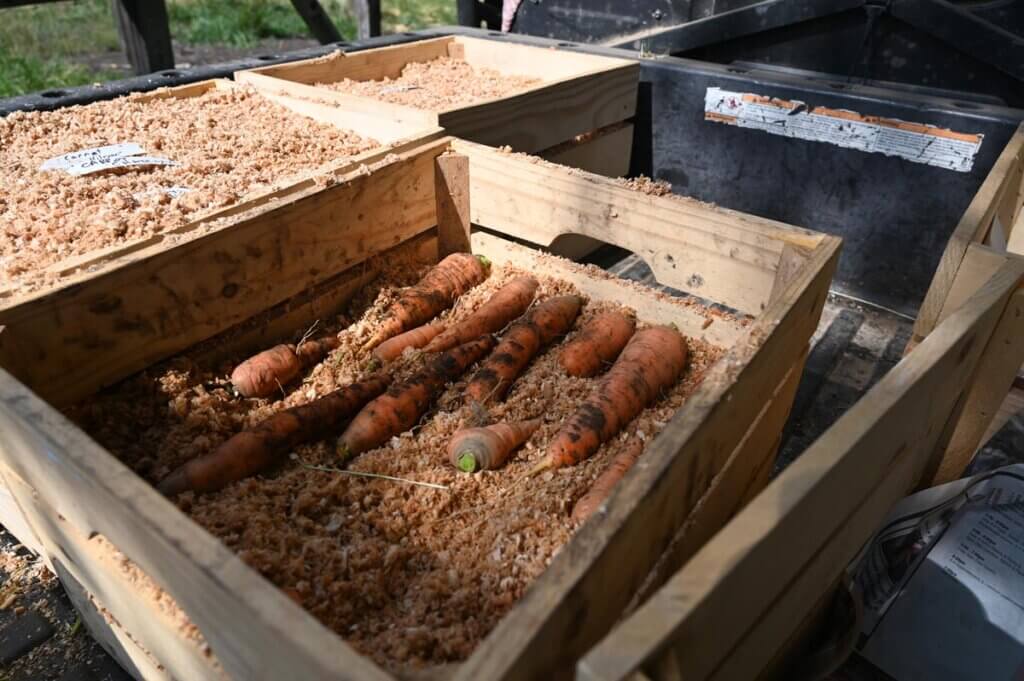
- Cold Temperatures - If you don't have a space with ideal cold temperatures (for most crops it's 32°F), Sam recommends storing crops in dampened sand or wood shavings. This will help keep crops cooler, even in a warmer environment. We have always used dampened wood shavings and stuck our crops into the shavings as close as possible without actually having them touching. We also use wooden crates. Though we don't struggle to keep our area in the basement cold, you could also look into something like a CoolBot (though this might be cost-prohibitive for many).
- Humidity - If you're struggling to keep up a high humidity, the damp sand or wood shavings will also help, but Sam also recommends storing crops in a plastic tote (think a large Rubbermaid container) with holes drilled into all the sides, top and bottom. Keeping crops in a breathable tote will increase the humidity if you're dealing with a low-humidity storage area. He then will lay a damp material (such as dampened sand) at the bottom of the crate with a separator between the sand and the vegetables to keep them clean. You can also lay out pans of water to keep your area more humid.
- Touching or Not Touching - I asked Sam whether or not crops should be touching in storage. Because Sam is achieving ideal conditions for his crops, he's never worried about them touching because bacteria cannot grow as quickly at 32°FHe doesn't have experience storing them the way we do, but his thought was that it wouldn't matter as much if they were touching or not. So, experiment with that on your own. Remember that if one vegetable goes bad, it will likely damage the ones touching it.
Sam also mentioned that the modern burlap sacks that are made from a plastic blend work very well for storing crops and they're a very low-cost solution. Sam uses the woven poly super-sacks (sometimes called sling bags) that cost roughly $25 each. These are a cubic yard version of the smaller bags that will hold upwards of 1,000 pounds of carrots in one bag (pictured further above in this post).

Ideal Root Cellar Conditions by Crop
If you can only create one space for storing all of your crops, Sam recommends a space under 40°F. He also recommends not washing your crops before storage and utilizing the storage bins with dampened materials for humidity.
If you're able to create unique temperature and humidity controlled areas, below is a table that lists ideal conditions by crop:
| Vegetable | Storage Duration | Ideal Humidity Level | Ideal Temperature |
|---|---|---|---|
| Carrots | 4-6 months | 90-95% | 32-40°F (0-4°C) |
| Beets | 3-4 months | 90-95% | 32-40°F (0-4°C) |
| Parsnips | 4-6 months | 95% | 32-40°F (0-4°C) |
| Potatoes | 6-8 months | 55-65% | 50-55°F (10-13°C) |
| Sweet Potatoes | Varies | 85-90% | 57-60°F (13-15°C) |
| Winter Squash | Varies by variety | 55-65% | 50-55°F (10-13°C) |
| Onions | 4-6 months | 55-65% | 32°F (0°C) |
| Garlic | 6-8 months | 55-65% | 32°F (0°C) |
| Shallots | 3-4 months | 55-65% | 32°F (0°C) |
Remember, the average homesteader doesn't have to keep all our crops in pristine condition. Many of our storage crops are starting to get soft in March or April, but that doesn't mean they taste bad or are unusable. These items are still edible; they just may require some more creative cooking methods.
I hope these storage methods are useful and that you plan on putting up more food next year. Root cellaring vegetables is one of the easiest forms of food preservation, and it's certainly one of our favorites.

Where to Find Sam
Be sure to check out Sam's book, Beyond the Root Cellar. Though this book is written for market gardeners and farmers, the information in the book will help with harvesting and storing, even on a small scale.
Be sure to also check out Offbeet Farm's website and follow along with Sam's journey on Facebook.