

Whether you are using Roma tomatoes, cherry tomatoes, plum tomatoes, or slicing tomatoes, this recipe for dehydrating tomatoes can make it easy. You can use a food dehydrator, the sun or an oven to enjoy your tomato harvest all year long.

The intense flavor of dehydrated tomatoes combined with herbs preserved in salt, dehydrated herbs, or frozen herbs in olive oil is my go-to addition to pasta salads, pizza toppings or pasta sauce.
Why I Prefer Dehydrated Tomatoes
I have been dehydrating, canning, freeze-drying tomatoes and fermenting tomatoes for years. I enjoy knowing I am providing my family with the best nutrient-rich foods possible. This method just couldn't be more straightforward!
There are times when I have a busy preservation day. There aren't many foods that cannot be dehydrated so my food dehydrator is a great asset with a heavy harvest. It is so easy to use; my kids often help out.
You can follow my food dehydrating 101 tutorial to learn how easy and versatile dehydrating tomatoes and many other foods can be regarding flavor and saving space in my pantry.
Dehydrating really reduces the size and weight of the tomatoes. The quantity of tomatoes I can dehydrate and store in large glass jars is enormous compared to the number of tomatoes and jars I use for canned sauces that would fill my pantry shelves.
Josh enjoys taking dehydrated tomatoes and my easy fruit leather in his hiking backpack. We know that weight is essential when hiking for miles in the mountains during hunting season.
Dehydrated foods are lightweight, easy to store and highly nutritional. They are delicious eaten dry as a snack, and equally as good when rehydrated and used for cooking. (Here's how to rehydrate dehydrated food.) It is our go-to for quick and easy snacks when working on our homestead or enjoying the great outdoors, hiking and camping.

Dehydration Methods
Sometimes, I have a bowl full of tomatoes that isn't quite enough for me to set up the canning process. In that case, I get out my dehydrator.
I find two features very helpful when dehydrating food: a temperature gauge and a fan. Circulating air around the food helps it to dry evenly.
Before I had a dehydrator, I used the oven method. Gas ovens only need heat from the pilot light to dry foods. Electric ovens can dry food with the oven light or at a low setting of 140°F with the door propped open.
Convection ovens are great, too, because of the circulating fan.
I have also used the natural sun drying method because we live in an area that is dry, not humid. I don't recommend drying foods outside if you live in a high-humidity area (or have inquisitive pets!).
Covering your trays of tomatoes with cheesecloth is essential to protect them from insects. Bring them inside at night because the cooler damp air can affect the drying process and cause mold. Moisture is the enemy when dehydrating tomatoes or any other food for that matter.
Homesteading Hack: Dehydrated tomatoes rehydrate quickly into a delicious sauce. Just place a big handful in the blender or food processor and cover with warm water. Let them sit for 20 minutes, then blend them into a thick, versatile sauce.

Storage Ideas
Tomatoes are a high water content food. They need to dry to a leathery or a crisp texture before storing. Too much water left in the tomato will grow mold and ruin the whole batch, and I don't ever want that to happen.
Dehydrated tomatoes are best when stored in an airtight container. I put my dried tomatoes in large glass jars and seal them with an automatic jar sealer.
Store dehydrated tomatoes in a cool, dark place. They will last 12 months on the shelf. If you have a jar sealer, I'd recommend re-sealing each time you get into them.
Typically a bushel of large tomatoes will fill a two-gallon glass jar. If pantry space is limited, I have also used freezer bags and stored dehydrated tomatoes in the freezer for up to a year.

FAQ'S
Is it necessary to blanch tomatoes before dehydrating them?
You don't have to blanch tomatoes before dehydrating them. I have found that they slice easier and don't fall apart when fresh and not blanched.
Removing the skin is the only reason to blanch the tomatoes before slicing and dehydrating. One more step in the process that I have found unnecessary. I like to keep it simple!
How long does it take to dehydrate tomatoes in a food dehydrator?
Drying time depends on the manufacturer's recommendation; every dehydrator has a different timeline.
I use an Excalibur dehydrator, which recommends 8-10 hours. However, I go by the "pop" sound they make when I bend them to test for my preferred way to know when they are dehydrated enough to store safely.
How do I know when my tomatoes are dry enough to store?
The important thing is to be sure there is no longer any moisture left in the tomatoes before you store them. When you go to test your tomatoes, take a few of the largest slices out of the dehydrator and let them cool for a few minutes. Then try bending them. They should either be crisp or leathery but not at all wet or mushy.
Alternatively, you can place a few slices into a zip-top bag and close the bag up. Wait about 30 minutes, and then check the inside of the bag for any signs of condensation. Your tomatoes aren't dehydrated if you see any moisture on the bag.

Supplies Needed
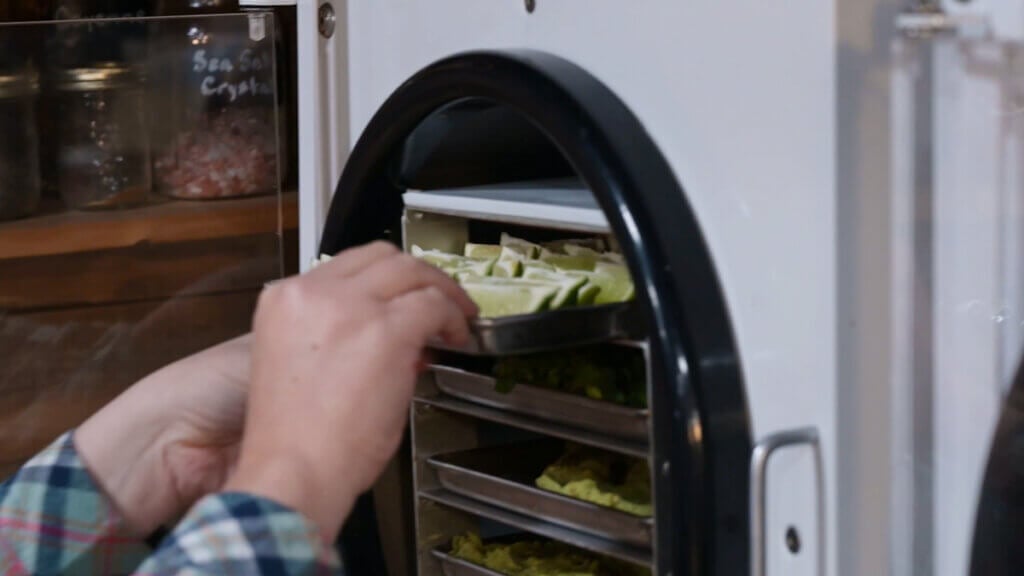
- Dehydrator - One with a circulating fan and temperature gauge is helpful but unnecessary. I have had this Excalibur dehydrator for years and use it so much that I bought a second one.
- Baking Sheets - When using the oven or sun drying method, I find covering the trays with parchment paper to prevent sticking makes clean-up so easy.
- Cheesecloth - Cover your tomatoes before placing them outside for the sun-dried tomatoes method.
- Knives - Small paring knife to cut away blemishes and stem core. Large sharp and serrated blades for slicing work best. (A sharp mandoline works well too).
- Cutting Board - A clean, large surface makes the work quick and efficient. (Learn how to clean a wooden cutting board properly.)
- Large Bowl - I find a bowl big enough to get my hands into with the tomatoes is useful.
Homesteading Hack: I use a handheld tomato slicer we found at an estate sale years ago that makes quick work when slicing a bowl full of fresh tomatoes.
Ingredients Needed
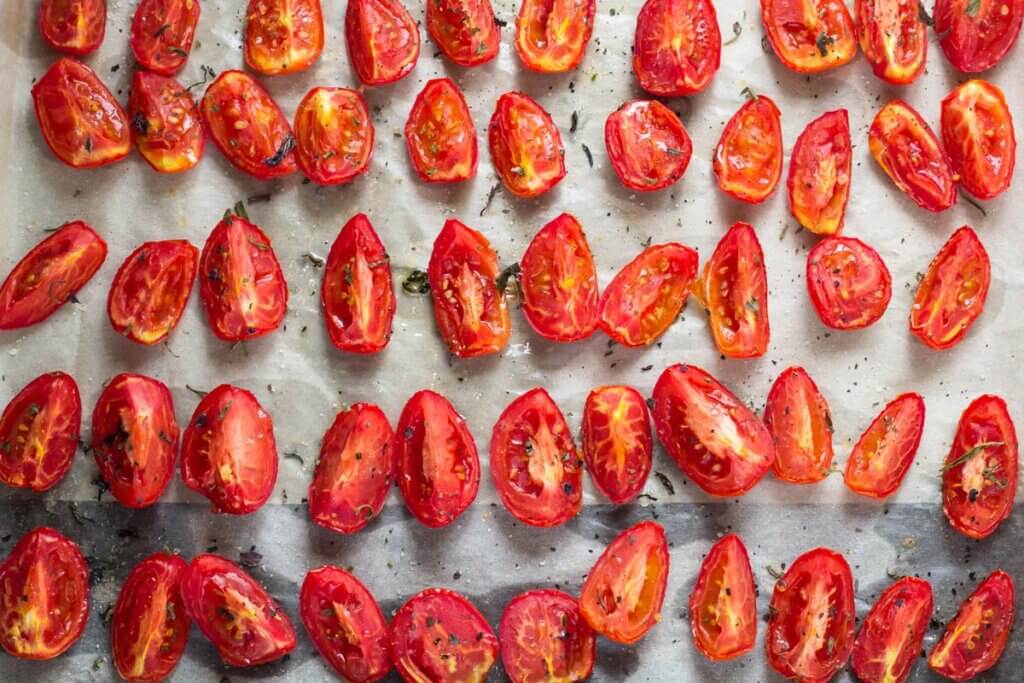
- Tomatoes - I use all types and sizes from my garden. I wash and dry them and cut out any blemishes and the stem core before slicing them into ¼ to ½-inch slices.
- Liberal Sprinkling of Fresh or Dried Herbs - I use my fresh, dried herb blend of choice for each batch I make. I like trying all kinds of herb blends, such as Italian, Mexican, and Greek. Variety is the spice of life!
- Salt - Redmond Real Salt is my go-to for all my recipes. Depending on the size of the batch, adding a tasteful sprinkling of salt adds flavor. (Using that link for Redmond Salt will automatically give you 15% off your order!)
Homesteading Hack: My general rule of thumb is one tablespoon of my preferred dried herb blend (2 tablespoons fresh) and one teaspoon of salt for every 3-4 medium-sized sliced tomatoes.

Easy Dehydrated Tomatoes Step-by-Step
- Wash and dry all the tomatoes with warm water and a clean kitchen towel.
- Using a paring knife, cut out the core stem and any blemishes.
- Place tomatoes with top and bottom horizontal on cutting board and slice into ¼ to ½ inch slices.
- Put tomato slices into a large bowl until half full.
- Sprinkle your preferred blend of dried or fresh herbs and salt liberally.
- Gently toss with clean hands until all the tomato slices have the desired amount of herb and salt blend.
- Place seasoned tomato slices ¼ inch apart (leave space for air to circulate through each piece) on dehydrator trays or cookie sheets, depending on which method you are using.
- Sun-Dried Method - Cover with cheesecloth if drying outdoors in a semi-shaded area. Depending on the weather, it will take longer when drying outside.
- Dehydrator Method - Place loaded racks in the dehydrator and set the temperature gauge to 140°F. Using the dehydrator will take about 8 to 10 hours.
- Oven Method - Put trays in the oven with the pilot light on if gas or oven temp to 140°F with the door cracked open if electric. Oven times vary and can take longer than the dehydrator method, usually 8-12 hours.
- It's best to check tomatoes every 4-5 hours with all three methods to store them at just the right texture. Homesteading Hack: I prefer my dehydrated tomatoes to be slightly crisp; a slight popping sound lets me know the tomatoes are dry when I bend them.
- Allow tomatoes to come to room temperature before storing.
Did you make this recipe? If so, please leave a star rating in the recipe card below. Then snap a photo of your dehydrated tomatoes and tag us on social media @homesteadingfamily so we can see!
More Posts You May Enjoy
- Freeze-Dried vs. Dehydrated Foods (What's the Difference?)
- Preserving Tomatoes for Winter - Fermented Tomatoes Recipe
- Quick and Hearty Easy Tomato Soup Recipe
- Fermented Tomato Sauce – Just 3 Ingredients!
- Homemade Garlic Salt (Easier & Better Than Store-Bought)
- Preservation 101-Dehydrating Food
- How to Dry Fresh Herbs
- Growing Tomatoes in Cold Climates (7 Tips for Success)

Dehydrated Tomatoes (3 Ways)
Equipment
- Dehydrator optional
- Oven optional
Ingredients
- tomatoes
- dried herbs
- salt
Instructions
To Prepare Tomatoes
- Wash and dry all the tomatoes with warm water and a clean kitchen towel.
- Using a paring knife, cut out the core stem and any blemishes.
- Place tomatoes with top and bottom horizontal on cutting board and slice into ¼ to ½ inch slices.
- Put tomato slices into a large bowl until half full.
- Sprinkle your preferred blend of dried or fresh herbs and salt liberally.
- Gently toss with clean hands until all the tomato slices have the desired amount of herb and salt blend.
- Place seasoned tomato slices ¼ inch apart (leave space for air to circulate through each piece) on dehydrator trays or cookie sheets, depending on which method you are using.
Sun-Dried Method
- Cover with cheesecloth if drying outdoors in a semi-shaded area. Depending on the weather, it will take longer when drying outside
- Allow tomatoes to come to room temperature before storing.
Dehydrator Method
- Place loaded racks in the dehydrator and set the temperature gauge to 140°F. Using the dehydrator will take about 8 to 10 hours.
- Allow tomatoes to come to room temperature before storing.
Oven Method
- Put trays in the oven with the pilot light on if gas or oven temp to 140°F with the door cracked open if electric. Oven times vary and can take longer than the dehydrator method, usually 8-12 hours.
- Allow tomatoes to come to room temperature before storing.
Notes
- It’s best to check tomatoes every 4-5 hours with all three methods to store them at just the right texture. Homesteading Hack: I prefer my dehydrated tomatoes to be slightly crisp; a slight popping sound lets me know the tomatoes are dry when I bend them.
- Allow tomatoes to come to room temperature before storing.


