


Learn how to ferment chicken feed for cheaper and healthier egg-laying hens. This feed is also great for meat chickens, geese, turkeys and even pigs. This simple four-step fermentation process will not only save you money on animal feed but will improve the health and quality of your livestock.

When raising backyard egg-laying hens, or raising meat chickens, we want to make sure we're doing everything we can to provide a safe environment that allows the chickens to thrive.
Whether that means keeping them in a portable chicken tractor or having a coop with ample vegetation, we want to give our chickens a healthy life and, in return, have them produce a healthy product for us.
Fermenting chicken feed is a great way to ensure you're feeding your chickens the healthiest food possible and to save money on your feed bill.
What Is Fermentation?
Fermentation, in its simplest form, is a biochemical process, meaning it combines biological and chemical processes to break down complex organic compounds into more simple elements.
When fermenting chicken feed, we're using lacto-fermentation (lactic acid bacteria) to break down whole grains into something more digestible and bioavailable for the chickens.
When you buy chicken feed from the store, it's generally already ground down and pre-formulated. This costs you more because someone else is mixing and grinding, but it isn't as healthy for the chickens as fermented whole grains.
Fermentation adds probiotics and other vitamins that enrich their feed, making it even healthier for the chickens, along with healthier eggs with stronger shells. (Source)

Why Feed Fermented Food to Chickens?
We've been fermenting our chicken feed for as long as we can remember. Our newest video above shows how we've improved our systems for our homestead and the size of our flock. Further below in this post, you can watch our older video, in which we first shared our fermenting system.
Don't get too hung up on how we do it, just find what works best for your needs and flock size and get started!
There are so many benefits of fermented chicken feed, such as:
- Save Money - Buying pre-mixed and pre-ground chicken feed can get costly. Especially if you're looking for non-GMO and/or organic varieties. By buying whole grains and fermenting them for better digestion, you can skip the grinding and feed your chickens a healthier feed for less money. Fermenting chicken feed increases the volume of the feed (along with more available nutrients) so your chickens end up naturally eating less.
- Healthier Chickens - As mentioned above, the fermentation process actually increases the nutritional content of the feed while also introducing probiotics for a healthier animal. (Source) This is one good way to be proactive in preventing common poultry diseases on your homestead.
- Better Digestion - The process of fermentation reduces phytic acid and enzyme inhibitors. Grains are made with a protective coating that seals in all their nutrients and allows them to be able to be stored long-term (which is why they're great to have in your long-term food storage supply). This means our animals have to work harder to digest the food and get the nutrients out, and much of those nutrients just pass through. So if we can make those nutrients more easily available then we're going to be able to feed our chickens less because they have more access to the full spectrum of nutrients in the grain.
- Healthier Eggs - It's so great when the health benefits for your animals are passed along to you. This is the case for eggs that come from chickens fed fermented feed. You can read more about that in this study here.

What Grains to Use?
The beauty of chickens is they're not picky about what they consume. You can use any grains you have access to. It's our opinion that choosing a variety of grains is good for diversity and nutrition.
Nature doesn't do monocultures and animals don't typically eat one kind of food.
Common grains to choose from are:
- Oats - Oats usually contain 11-14% crude protein. Some of the newer high-producing varieties will have 10% or less protein.
- Wheat - Wheat is higher in protein than other common feed grains, coming in between 14-18%.
- Corn* - Corn has about 10% protein content. We rarely use corn in our chicken feed mixture because it's difficult to source non-GMO organic corn where we live. Corn can be a great supplement, if you're able to find a good quality source.
- Barley - This has about 13.5% protein content.
- Peas - Peas are the winner when it comes to protein. Peas have about 20-29% protein, depending on the variety (field peas having the highest amount).

Mixing Grains for Chicken Feed
When you buy a chicken feed, it's generally about 16% protein. It's ideal to try and formulate a chicken feed that will be close to that, but it doesn't have to be exact.
The grains listed above range from about 7-18% protein content. We don't stress too much about the exact protein ratio because our chickens have access to the outdoors, where they can roam and forage for bugs to bridge any protein gaps they may have.
We buy our individual grains in large, bulk quantities and then mix them in large metal feed bins (with lids) that we store in the barn for daily access. From there, we scoop that pre-mixed blend into our fermentation buckets.
If you can't find quality grain near you, check out Azure Standard. They have some animal feed in larger bulk quantities for great prices that can be delivered to a drop location near you.

How to Ferment Chicken Feed
Fermenting chicken feed is a simple process that takes about three to five days, depending on your climate. We used to stop fermenting in the winter months because our weather is just too cold, but we've since learned some tips and tricks that we'll share below so you can continue fermenting in a non-temperature controlled environment.
Supplies & Ingredients Needed
- Buckets - We use a three-bucket system with five-gallon buckets. One five-gallon bucket holds enough feed for our chickens and pigs. Assuming you need about ¼-1/3 lb of feed per bird every day you can figure out your bucket size. You can even use quart, half-gallon or gallon-sized Mason jars.
- Starter Culture (optional) - Having a starter culture is ideal because it will kickstart your ferment. We like to use some of the liquid from the previous batch of fermented feed. But to get started, you can use whey, raw milk, yogurt or any other cultured product (kombucha, sauerkraut liquid, etc.).
- Water - Having access to water is ideal because you'll need to cover the grain with water for the fermentation process. Ideally, you want enough water for the fermentation process with just a bit left over after feeding the grain to your chickens. If your tap water is chlorinated, allow the water to sit out for 24 hours prior to using. Or, use filtered water.
- Seed Starting Mat - This is our hack for fermenting chicken feed in the winter months! If you don't have a temperature-controlled environment, it's possible for your chicken feed to freeze solid (at least where we live!). By using the seed starting mat, it adds just enough heat at the bottom of the bucket to keep our ferments going strong.
- Blanket - We cover our buckets with a large blanket to keep as much heat from those seed starting mats in as possible. This has worked even in single digits where we live. If you get significantly colder than that, you could also build an insulated box.

Step-by-Step Directions
Day 1
- Add mixed grains to a five-gallon bucket. I use about 3.5 scoops (or roughly 17.5 pounds) of grain per day for our chickens and pigs, which fills our buckets about halfway. Homesteading Hack: Don't be tempted to overfill your buckets. The grains will expand and nearly double in size.
- Add about two cups of starter liquid, such as the liquid from a previous batch of fermented chicken feed, whey, raw milk, yogurt, etc.
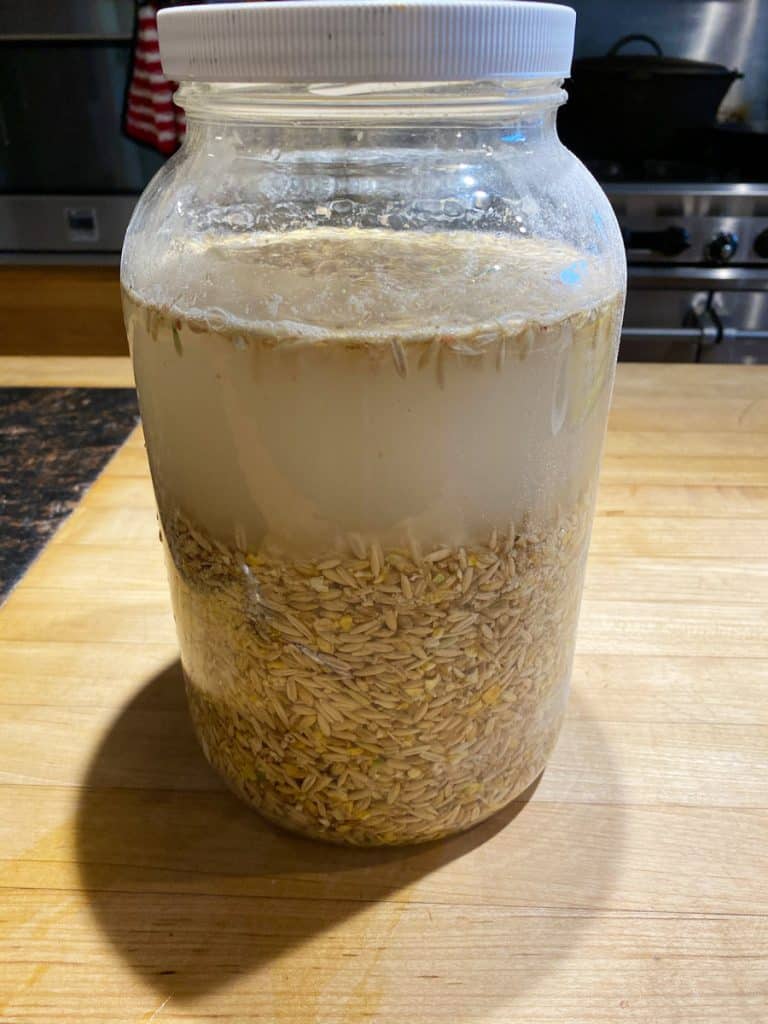
- Add water to the bucket until it's almost full and stir well to distribute the starter culture evenly. I fill our five-gallon buckets until the water is about two to three inches from the top. How full you fill your container will be determined by how much feed you have. I like to cover the feed about twice as deep with water. If you don't add enough, the grains won't ferment as well. You want enough that the grains can absorb all the liquid they need while leaving enough liquid at the bottom for your next batch of fermented feed. Homesteading Hack: I fermented a smaller quantity of chicken feed in a one-gallon glass jar so you could see just how much the volume increases (see photos below).
- Cover the bucket with the lid, but don't seal it. YOu want the lid to rest on top to allow air to escape while keeping critters out. You could also use some cheesecloth or a large paper filter if pests are an issue.
- The ferment will perform best at room temperature, but this isn't necessary (and likely not where you'll want to ferment your chicken feed). Just know that in warmer temperatures, the ferment will take place faster, and in colder temperatures, it will take longer (anywhere from 1-4 days). In the colder months, if temperatures are below freezing, place your bucket on a heated seed starting mat and then cover it with a large, thick blanket for added insulation.
Day 2
- Check on your feed. You'll notice the grains have grown in size and absorbed much of the liquid. If they look dry, add more water at this time and make a mental note to add more water to today's fresh batch.
- If you'd like, you can transfer the fermenting feed to a fresh clean bucket, but this isn't necessary. Give the feed a little stir if you'd like, though this also isn't necessary.
- Typically speaking, on day two, I don't do anything except start a fresh bucket of grain (following directions from day 1).

Day 3
- Check on your feed. You may start to notice some bubbles. These bubbles are the off-gassing of the bacteria and are completely normal and good. If you add milk, you may also notice some "cheesiness" to the ferment. The grains will be nice and plump and, if you try to pierce one with your fingernail, should be soft and pliable.
- If you'd like, you can transfer the fermenting feed to a fresh clean bucket, but this isn't necessary. Give the feed a little stir if you'd like, though this also isn't necessary.
- At this point, we generally feed our animals with the fermented feed. If you prefer a fourth day of fermenting, just leave the bucket and wait one more day.
- Start a fresh bucket of grain (following directions from day 1).

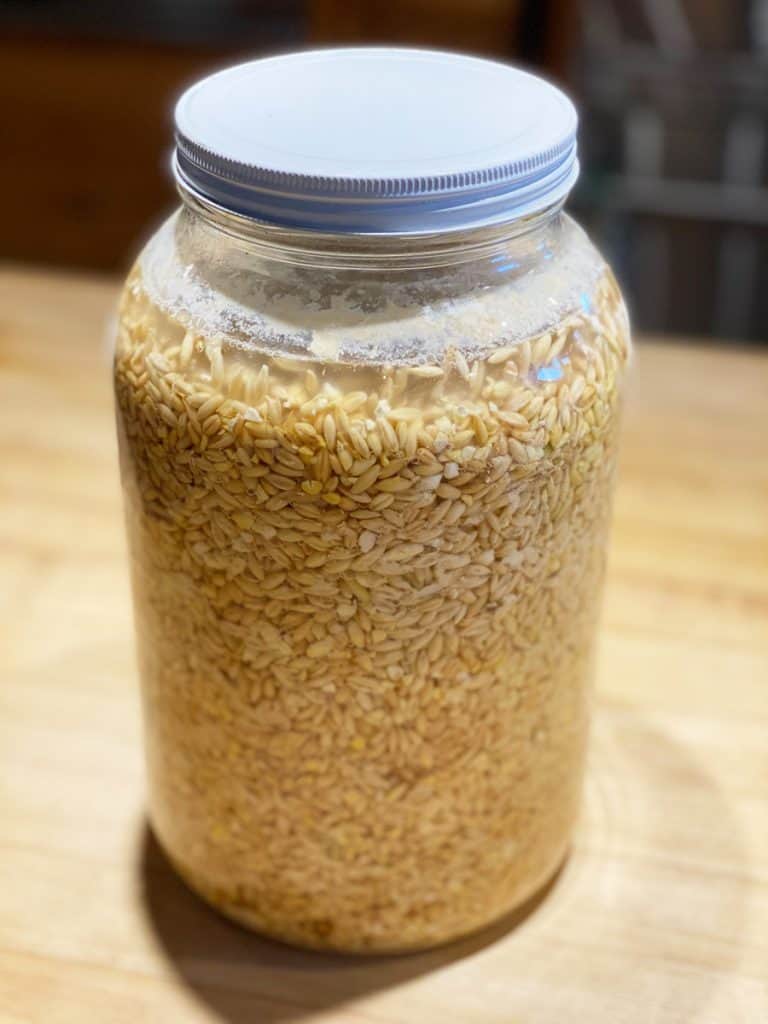
Final Day or Day 4
Notice how full the final bucket is after it's soaked up all the liquid and expanded! You can also see the "cheesiness" in the photo above. This was a batch that we started with whey and excess raw milk.
- When you're ready to feed your animals, transfer the feed to a bucket with a hole drilled in the bottom so any excess water can drain out. Remember to save about 2 cups of the liquid to inoculate your fresh batch of feed.
- Start a fresh bucket of grain (following directions from day 1).
Continue this process daily, and you'll always have enough fermented chicken feed to feed your flock.

General Fermented Feed Tips
- Whole grains ferment best and will contain the most nutritional value.
- Always make sure the feed stays below the water level. If you need to top it off with more water, that's perfectly fine. Any grain left exposed to air has the potential to attract mold spores.
- Your fermented feed should not stink. A sour, yeasty or slightly acidic smell is normal.
- If there are any signs of mold or if the fermented feed stinks, throw it out and start over. It's not worth the risk to your flock! Homesteading Hack: We like to periodically rinse out our fermentation buckets with some water and a splash of vinegar to keep things nice and clean.
- Don't expect to see any bubbles on the first day (24 hours). Depending on the temperature, you may not see them until the second or third day.
- Try to aim for the right amount of water. Though you can't have too much water, having more than is necessary can make it harder to notice if the fermentation process is working. The ideal consistency should be a thick soup-like consistency.
- Chlorinated water will kill both good bacteria and bad bacteria. If you have chlorinated water, let it set out for 24 hours to allow the chlorine to dissipate prior to starting your fermented chicken feed.

How Do I Know If I'm Feeding the Right Amount?
Always start with a full ration of feed, which is between ¼-1/3 lb of dry mixed grain per bird per day.
Homesteading Hack: If you feed your chickens twice a day, you'll want to decrease each feeding to about ⅛ lb of dry mixed grain per bird.
- Excess Food - If you notice there is extra feed on the ground when it's time for the next feeding, you can decrease the amount of food you give them. Likewise, if you notice there is never any food left on the ground, you can increase the amount. But not so much that there's extra left over, just increase gradually enough to where they're consuming it all.
- Free Range - As you're able, get your chickens out into the open pasture or even a fenced-in area of your backyard where there is plenty of vegetation so they can peck and scratch for bugs. The more they can roam, scratch and peck, the more it will reduce the amount you need to feed them daily.
- Egg Production - You'll want to track your egg production by writing down how many eggs you bring in each day. For accurate records, you'll need to do this daily for a long period of time. Egg production naturally can vary from day to day or season to season. As you get familiar with your flock's egg production, you'll be able to know if a decrease in egg production is due to too little food. If you notice a gradual decline in egg production, you may want to increase their feed.
- Egg Quality - If you notice a decline in the egg quality (the color of the yolks is paler, or the shell is more brittle), your chickens may not be getting adequate nutrition from bugs. In this case, you'll want to increase the protein amount of their feed.
Just know that the amount of feed your chickens will require is constantly changing throughout the year. In the spring and summer, they'll likely need less feed because of the insects, buts and vegetation that are available.
And there you have it! Everything you need to know about fermenting chicken feed to lower your cost and improve the health of your chickens (and their eggs)! Be sure to check out the Frequently Asked Questions below!
Frequently Asked Questions
You don't have to add a starter culture for fermentation if you don't want to, your grains will eventually begin to ferment after a few days. However, if you want to inoculate your feed on day one to jump-start the fermentation process, you can take about two cups of the liquid from day 4's bucket (before dumping it out) and add that to your fresh batch each time you make it. Alternatively, you can add about a cup or so of any other ferment you might have going in your kitchen (kombucha is a great option or even apple cider vinegar with the Mother!)
Where we live we don't have organic chicken feed available to us at a reasonable price we're willing to pay, so we use a non-GMO scratch mix (for even further cost savings). If you have organic quality feed available that you can afford, then this would be our recommendation. However, we've found that if you can allow your chickens to free-range, or if you keep them in a portable chicken tractor, this is even better and you can get away with a lesser quality food because they're getting plenty of nutrients from bugs and other vegetation.
We haven't tried this method with mash or pellets, and it seems like it would be quite messy. It's also more expensive. The scratch mixture is the feed we use and we have been very happy with the results.
Most feed bags will tell you ¼-1/3 lb of food per chicken per day. We always start on the lower end and adjust as needed. You may find that ¼ lb of fermented feed is more than enough for your chickens depending on what other bugs are available to them. Read our next tip for how to know if your chickens are getting enough feed.
Yes! We feed this to our chickens (both egg layers and meat chickens), turkeys, ducks and pigs! It's important to make sure the protein ration is adequate for the animal you're feeding. So always do your research.
Scratch, in and of itself for chickens that are in a smaller space is not enough protein for your chickens. We use scratch because it's less expensive, then by soaking and fermenting we're bringing out the nutrition that's there and adding vitamins, probiotics and other nutrition. But if you're raising chickens in a small coop in the backyard that's not getting moved around, the scratch will not be enough nutrition for your chickens. If you can allow your chickens to free-range for bugs and vegetation, this is the best combination with the fermented chicken feed. During the summer months when they're out in large areas of pasture, we can lower the food they're getting each day even further. You just have to let your chickens tell you how their nutrition is going.
There should never be an off odor to your feed. It may smell slightly sour (I actually think it smells kind of sweet, much like kombucha or water kefir), but if it smells repulsive or moldy, then I would toss it out and start a new batch.
Some people think many fermented foods smell bad. We think fermented foods have a pleasantly sour, almost sweet smell. However, some of our kids would disagree with that description!
If your fermented chicken feed smells repulsive, you may be having some issues that are likely fixable.
- If your temperature is hot, your ferment will be ready in less time and you may not need a full four days. Experiment with as little as 24-48 hours.
- Make sure your fermenting grain stays submerged. If you have grain that floats to the surface and is exposed to oxygen, this is an opportunity for bad bacteria to grow and ruin your ferment.
- Make sure you're stirring your ferment each day (we do this by transferring buckets) to allow any air pockets and all of the grain to get fully fermented and soaked by the water.
- Use some of the "brine" or water from your day 4 ferment to innoculate your fresh batch. This can speed up your ferment if things are extremely cold where you live and the process is taking too long.
- If you have large temperature fluctuations, try moving your ferment into the barn, garage, or even a mudroom where the temperature is more stable. Ferments really do best with a slightly warmer climate, anywhere from about 68-76 degrees Fahrenheit. This doesn't mean your feed won't ferment in colder temperatures, it will just take longer.
Related Posts
- Broody Hen Management
- Deep Litter Method for Backyard Chickens (With or Without a Coop)
- How to Handle Farm Fresh Eggs
- Using Medicinal Herbs on Farm Animals
- Mineral Supplements for Livestock
- 5 Egg Preservation Methods (Use or Preserve Your Extra Eggs)
- Everything You Need to Know About Raising Meat Chickens
- Using Chickens to Restore the Land


