


Preserved lemons (also known as fermented lemons) are a trade secret of many high-end chefs. Learn how to make this "secret ingredient" at home so you can incorporate it into your recipes as well.
Why I Love this Recipe
Lemons are often thought of as a sweet food, but this preserved lemons recipe will make a wonderful addition to savory dishes such as a lemon sauce for roasted chicken, fish, pastas, and salad dressings.
Because the flavor is incredibly potent, one section of lemon can really intensify the flavor of your recipes. While you can eat the flesh of the lemon, the part that brings the flavor is actually the rind. The fermentation process changes it from stiff and rigid to more pliable.
To evenly distribute this potent flavor, you will want to dice the lemons very finely for whatever recipe you use them in. Our favorite way to use lacto-preserved lemons is combining them with fresh spring vegetables over homemade pasta to make a delicious pasta primavera.
What are Lacto-Preserved Lemons?
Lacto-Preserved lemons are traditionally called preserved lemons. They are a fermented lemon using a salt water brine that allows for the entire lemon to be consumed.
Fermenting lemons is a great way to use up a surplus of lemons before they go bad. Plus it's a great way to enjoy that delicious citrus flavor all year long.
Why Lacto-Preserve Lemons?

Lacto-preservation provides the health benefits of probiotic bacteria to build a healthy immune system, while simultaneously preserving foods for long term storage to build up a food storage supply. (Source)
Once fully fermented, these preserved lemons can literally sit on your pantry shelf for years at a time.
It's important to note that I am not a certified medical practitioner. This post is not intended to diagnose or treat but is for informational purposes only. Please contact your healthcare professional before introducing new herbal and natural remedies into your wellness routine.
Ingredients and Supplies Needed

- Organic Lemons - Depending on the size of your lemon, you will need about 6-10 lemons to fill a quart jar.
- Lemon Juice - I use this as a “backup” in case my jar needs to be topped off with any additional fresh lemon juice. Just be sure this lemon juice is from fresh lemons and not from a bottle with preservatives in it!
- Spices - One of the great things about preserving your own lemons is that you can control how it’s flavored. In this recipe, I used ten peppercorns, three cinnamon sticks, and two fresh bay leaves right off the bay bush in my cottage garden. Alternatively, you could use cloves, chili pepper, or thyme...feel free to use whatever appeals to you.
- Salt - Sea salt or kosher salt helps draw out the juice from the lemons to facilitate the fermentation process. (Source) For every quart jar of lemons, you will need about five teaspoons of salt.
- Quart Size Canning Jar - This recipe can be scaled up or down depending on how many lemons you would like to preserve.
- Two-Part Canning Lid - You will need to turn your jar upside down for twelve hours at a time, so make sure that this is a lid with a functional rubber seal so that the jar does not leak.
- Sauerkraut Pounder - If you do not have a sauerkraut pounder, a wooden spoon works well.
How to Preserve Lemons Step by Step


- Scrub lemons in hot water, and remove any remaining stems. Do not use soap or produce washes, scrubbing in hot water is sufficient.
- Place spices in the bottom of the jar.
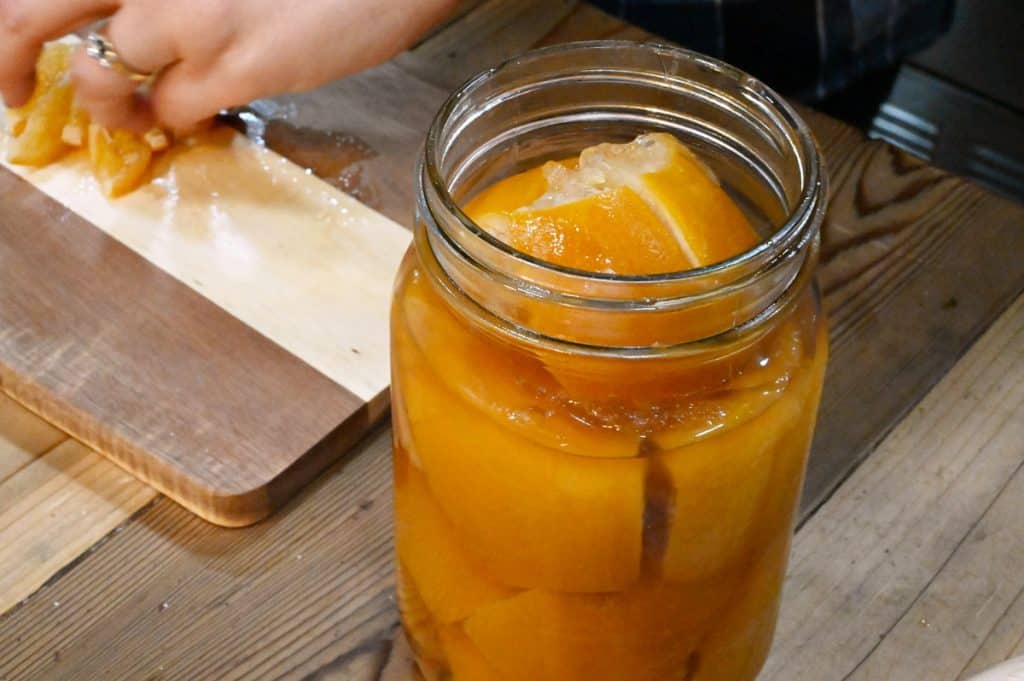
- Placing the stem side down (this is the flatter end, the blossom end is the pointy end of the lemon), score your lemons in quarters. Do not worry if you cut your lemon all the way through, but try to keep it attached at the base, this makes the next step easier. Cutting your lemon all the way through does not affect the fermentation process, the scoring is simply for aesthetic appeal.
- Open the lemon, and sprinkle a generous amount of salt onto the flesh. If the seeds begin to fall out, simply remove them. You don’t need to make a big fuss about removing all the seeds, but you can remove them if you like.
- Place lemon in the jar with the cut side of the lemon facing upwards.
- Repeat the scoring and salting of the remaining lemons stacking on top of one another. Use a sauerkraut pounder or wooden spoon to pack as tightly as possible, pressing the lemons into the jar. Packing the jar tightly helps to further extract the juice from the lemons which will facilitate the fermentation process. As the jar becomes full, you will notice that it should also be filling up with lemon juice.
- Once the lemons are packed to the brim of the jar, pour in any remaining salt, and if the lemons are not completely submerged in juice, top off the jar with the additional lemon juice.
- Cover the jar with a two-part canning lid, and let sit on the countertop for about 4-5 days.
- During this time, alternate turning the jar upside down for 12 hours, and then right side up for 12 hours. This will ensure that the lemons are equally covered by the brine to prevent molding.
- After this time, the jar is ready to go into cold storage for up to a year. This can be in a root cellar, a cool pantry that is at least 55 degrees or below, or a refrigerator. While in cold storage, continue to flip the jar when you think about it (or once every 3-5 days) to prevent molding. Allow the lemons to marinate for about a month to completely develop their flavor before using.
How to Use Preserved Lemons
Preserved lemons are a delicious addition to savory dishes such as fish and chicken and can be diced up and added into sauces and gravies.
In most cases, you'll only need to use one quarter of the lemon. Because the lemon slices are nearly cut through, they should be fairly easy to remove as needed.
You can see how I use preserved lemons in this Dutch Oven Roasted Chicken with Preserved Lemon and Thyme Reduction Sauce.
How to Store Preserved Lemons
As mentioned in the recipe above, you can store preserved lemons in the refrigerator, root cellar, or cold pantry (55 degrees F or cooler). If you don't have a root cellar or cold pantry, they're best off in the refrigerator.
More Fermentation Resources

- Lacto-Fermented Green Beans Tutorial (aka: Pizza Beans)
- Easy Homemade Lacto-Fermented Mayo
- Preserving Tomatoes for Winter – Fermented Tomatoes Recipe
- Easy Homemade Fermented Cranberry Sauce
- How To Make Your Own Lacto-Fermented Sauerkraut
- Homemade Fermented Ginger Carrots
- Quick & Easy Refrigerator Pickles (Garlic Dill Pickles)
- Preserved Limes With Fermentation
Did you make this recipe? Please leave a star rating on the recipe card below! Then snap a photo of your preserved lemons (or the many ways you choose to use them) and tag us on social media @homesteadingfamily so we can see!

Preserved Lemons (Lacto-Fermented Lemons)
Equipment
- Quart-Sized Glass Jar I use these canning jars from Azure Standard.
- Two-Part Canning Lid I use these canning lids from Azure Standard.
- Sauerkraut Pounder This kraut stomper, or a sturdy wooden spoon works great.
Ingredients
- 6-10 Medium Lemons organic
- Lemon Juice if needed
- Spices optional - cinnamon sticks, bay leaf, cloves, chili pepper, or thyme
- 5 Teaspoon Sea Salt We use Redmond Real Salt. Use that link to automatically get 15% off your order!
Instructions
- Scrub lemons in hot water, and remove any remaining stems. Do not use soap or produce washes, scrubbing in hot water is sufficient.
- Place spices in the bottom of the jar.
- Placing the stem side down (this is the flatter end, the blossom end is the pointy end of the lemon), score your lemons in quarters. Do not worry if you cut your lemon all the way through. This does not affect the fermentation process, the scoring is simply for aesthetic appeal.
- Open the lemon, and sprinkle a generous amount of salt onto the flesh. If the seeds begin to fall out, simply remove them. You don’t need to make a big fuss about removing all the seeds, but you can remove them if you like.
- Place lemon in the jar with the cut side of the lemon facing upwards.
- Repeat the scoring and salting of the remaining lemons stacking on top of one another. Use a sauerkraut pounder or wooden spoon to pack as tightly as possible. Packing the jar tightly helps to further extract the juice from the lemons which will facilitate the fermentation process. As the jar becomes full, you will notice that it should also be filling up with lemon juice.
- Once the lemons are packed to the brim of the jar, pour in any remaining salt, and if the lemons are not completely submerged in juice, top off the jar with the additional lemon juice.
- Cover the jar with a two-part canning lid, and let sit on the countertop for about 4-5 days.
- During this time, alternate turning the jar upside down for 12 hours, and then right side up for 12 hours. This will ensure that the lemons are equally covered by the brine to prevent molding.
- After this time, the jar is ready to go into cold storage for up to a year. This can be in a root cellar, a cool pantry that is at least 55°F or below, or a refrigerator. While in cold storage, continue to flip the jar when you think about it (or once every 3-5 days) to prevent molding. Allow the lemons to marinate for about a month to completely develop their flavor before using.


