
Freeze drying chicken is practical and easy for busy nights when you want to bring a healthy meal together in less time. It’s shelf-stable for years when stored properly and doesn’t take up valuable space in your deep freezer. Use this guide to get started.
Why I Love Freeze Drying Chicken
Here on our homestead, we keep Red Ranger meat chickens, among other livestock, to raise a year’s worth of meat. Our primary method of meat preservation is the deep freezer, but it’s wise to diversify our food storage, so learning how to can raw chicken was a good solution.
Then, using a home freeze dryer became an option. You can read these posts on the difference between freeze dried food and dehydrated food and what foods should not be freeze dried.
Over the years, we've freeze dried plenty of food items (I'll list some other freeze drying posts below). From freeze dried meat to ready-made meals like freeze dried chicken pot pie, there's so much you can do with a freeze dryer. You can read my one-year review of the Harvest Right Freeze Dryer and Harvest Right Freeze dryer FAQs here.
These freeze dried foods make for fast and convenient meal preparation, have a longer shelf life than canned goods, free up freezer space, and provide emergency preparedness during a short-term power outage.

Is It Better to Freeze Dry Raw or Cooked Chicken
You can freeze dry either pre-cooked or raw chicken. It’s important to know that freeze drying chicken allows you to store it at room temperature, but the freeze drying temperatures of -30°F to -50°F do not kill off the harmful bacteria that can make you sick.
The freeze drying process puts this bacteria in dormancy, preventing it from multiplying when stored properly.
If you raise chickens or come across a good deal at the grocery store and need to process a lot of chicken, you can freeze dry it raw, then rehydrate it to cook later.
Always use proper, safe handling methods before and after freeze drying. Raw chicken freeze dried is still raw chicken when rehydrated.
I prefer cooking the chicken first for two reasons.
- It rehydrates faster than raw freeze dried chicken.
- Once it is seasoned and precooked, it is fast and convenient to use in our favorite dishes.
Either way has benefits depending on the end product you are making.
The important thing to remember is to safely and properly handle it before using it in your favorite recipes. In addition to taking proper sanitary measures, removing the bones, skin, and visible fat is critical for the freeze drying process to be successful.

Supplies Needed
- Freeze Dryer - I recommend the Harvest Right Freeze Dryer. It comes in four sizes, making it versatile for your particular needs. Homesteading Hack: My recommendation is always to buy the largest size you can afford. I've never wished I got a smaller machine.
- Parchment Paper - To prevent the chicken from sticking to the freeze dryer trays, we prefer natural products to petroleum-based wax paper and recommend the liners from Harvest Right or If You Care Parchment found at Azure Standard. Homesteading Hack: If you’re a first-time Azure Standard customer, use coupon code “HOMESTEADINGFAMILY15” at checkout for 15% off your order of $100 or more!
- Knives - Sharp, clean knives to cut, chop and slice the chicken to the proper thickness is essential.
- Food Scale - Weighing the chicken before and after freeze drying ensures you have removed 99% of the water from the chicken for the best end product.
- Cutting Board - A clean poultry-specific cutting board for preparing the chicken is a good safety precaution. (Learn the best way to clean a wooden cutting board!)
- Cooking Source - If pre-cooking the chicken before freeze drying, you will need a stove, oven, Instant Pot, BBQ or Crock Pot to ensure it’s thoroughly cooked.
- Meat Thermometer - Using a meat thermometer to make sure the chicken is cooked to a safe and recommended temperature is a good safety measure before freeze drying.
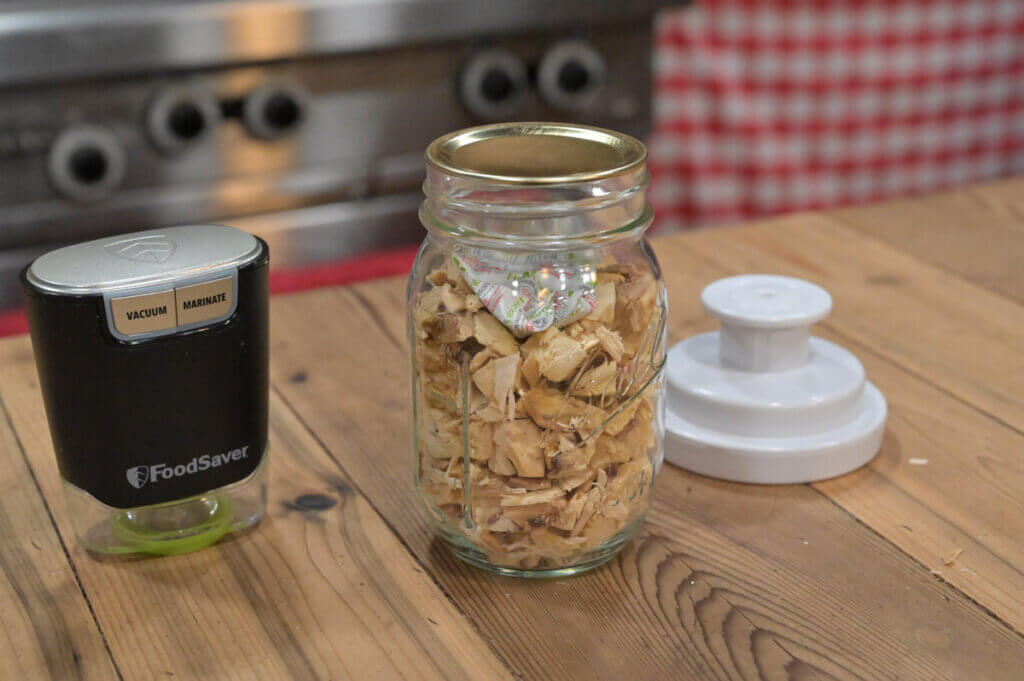
- Mason Jars or Mylar Bags - Storing freeze dried food with an airtight seal is essential. We use Mason jars for most of our storage because they’re reusable, but when we use Mylar bags, we purchase them from Azure Standard. Keep in mind you will need a vacuum sealer if using the bags.
- Jar Sealer – If storing in Mason jars is the best approach for you, I recommend using this jar sealer to ensure an air-tight seal. Homesteading Hack: Promptly re-seal the jar after every use.
- Oxygen Absorbers – Oxygen is the enemy of freeze dried food. Using an oxygen absorber gives extra insurance to your airtight seal. We buy our oxygen absorbers from Azure Standard.

Ingredients Needed
- Chicken - Any cut of quality fresh chicken can be freeze dried, but you must remove the skin, fat and bones from the meat. Homesteading Hack: Use your chicken scraps to make this immune-boosting broth.
- Seasoning - I like to use my fresh herbs preserved in salt, homemade garlic salt, poultry seasoning recipe, and onion powder made from scratch to season the pre-cooked chicken before freeze drying. I recommend seasoning the chicken after reconstitution if you freeze dry it raw.


Freeze Drying Chicken Step-by-Step
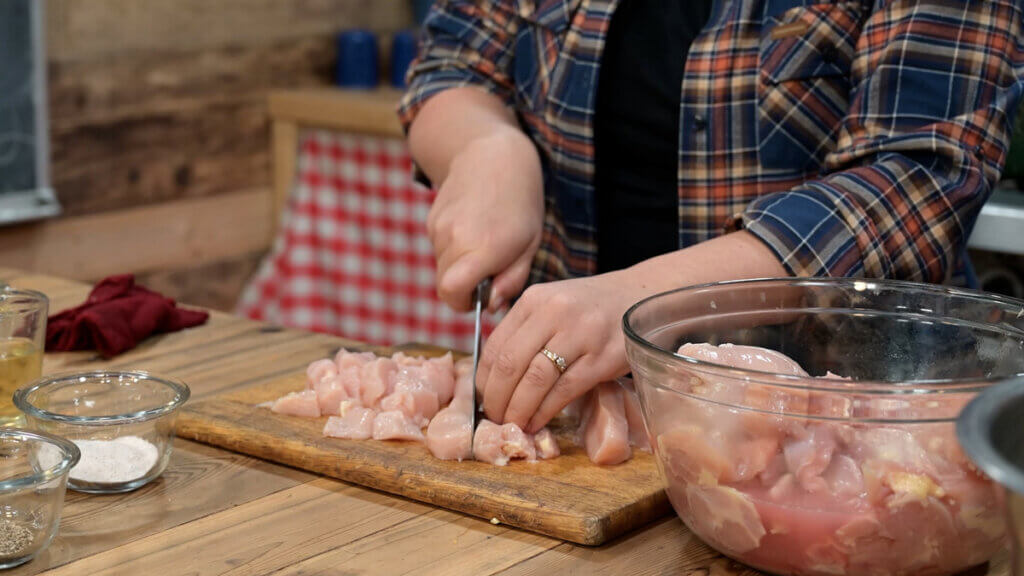
- Prepare the chicken on a clean, poultry-designated cutting board with a clean, sharp knife by removing the flesh from the bones and trimming unwanted fat and skin. Homesteading Hack: Fat and skin go rancid quickly, spoiling the freeze dried chicken; it’s best to remove all visible fat.
- The chicken should be at most an inch thick and cubed for best results. If thicker, it will become brick-hard and be challenging to deal with. Weigh the prepared chicken and write it down for future reference after it's freeze dried.
- Cook and season the chicken, allowing it to cool slightly. If you're using raw, skip this step.
- Line the freeze dryer trays with parchment paper.
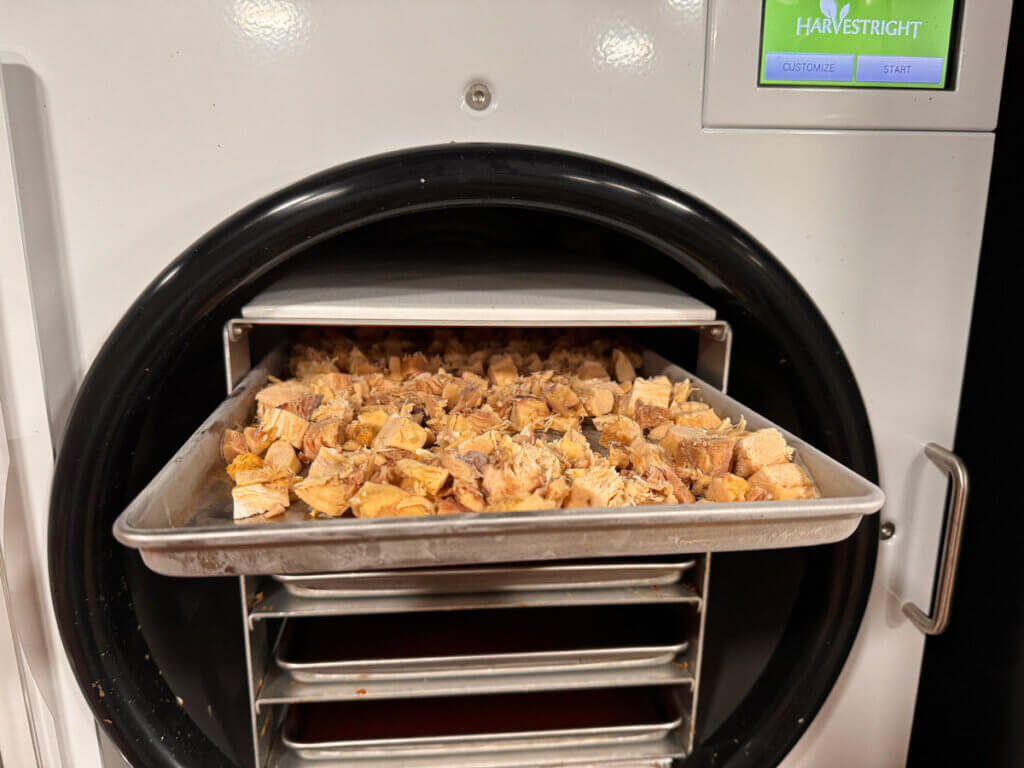
- Arrange the chicken (cooked or uncooked) on the freeze dryer trays leaving just a small space between each piece. Pre-freeze the chicken for 12-24 hours before freeze drying. Homesteading Hack: Pre-freezing the chicken is more cost-effective, using less time and energy in the freeze dryer.
- Place the trays into the freeze dryer and set a timer for the recommended amount of time for the chicken, then add 12 hours of dry time.
- Once the initial dry time begins, stop the machine (to stop the machine, turn the extra dry time down to zero by pushing the down button). Release the drain valve and remove a tray of chicken. Weigh the tray, put it back into the freeze dryer, and add the 12 hours of additional dry time back.
- After two or three hours, follow step 7 again. If there has been ANY change in the weight between the first and second weighing, it's not done because it's still losing water. Continue this process every 2-4 hours until there is no weight difference between stops.
- Once finished, store the freeze dried chicken in an airtight container with an oxygen absorber. Vacuum seal, label, and date the jar and place it on your shelf until ready to use.
Homesteading Hack - There's no harm in OVER drying something in the freeze dryer, but under-drying could result in a ruined product (or worse, a foodborne illness.)

How to Tell If Freeze Dried Chicken Is Done
It is important to make sure protein-based foods are completely freeze dried to avoid bacteria overgrowth. The chicken should not be cold to the touch when properly freeze dried.
When it comes to meat, I like to use the weighing method to be sure no more moisture is present in the food. If it makes you feel more comfortable, in addition to the weighing process, break a piece of chicken in half: if moisture is present or it is cold to the touch, return it to the freeze dryer until done.

How to Rehydrate Freeze Dried Chicken
The most accurate way to know how much liquid is needed to rehydrate any freeze dried food is to weigh it before and after freeze drying. Keep notes and add the difference between the two weights when rehydrating.
Keep in mind that raw freeze dried chicken will take longer to rehydrate than pre-cooked freeze dried chicken. However, rehydrating raw freeze dried chicken is easy because you can reconstitute it in broth (or a marinade with added water) for more flavor.
To rehydrate raw freeze dried chicken: Place the raw, freeze dried chicken in a bowl of cold water, chicken broth or marinade, allow it to rehydrate in the refrigerator and handle it safely like you would any raw meat.
To rehydrate cooked freeze dried chicken: If the meat was cooked before freeze drying, you just need to reconstitute it in a bowl of warm water or broth. This can be done at room temperature for 15-20 minutes. Use the chicken as you would any other regularly cooked chicken.
How to Store Freeze Dried Chicken
Store freeze dried chicken in an airtight container, vacuum sealed with an oxygen absorber. Add a fresh oxygen absorber and re-vacuum seal whenever you remove chicken from the jar.
For best results, keep away from light and humidity. Freeze dried chicken can be stored at room temperature (ideally below 72°F).
Did you freeze dry chicken using this tutorial? If so, please leave a star rating in the recipe card below, then snap a photo of your freeze dried chicken and tag us on social media @homesteadingfamily so we can see!

Becoming a Freeze Drying Master
Did you know that when it comes to freeze drying, every food is unique and can have minor differences that either make or break your success?
In my book Freeze Drying the Harvest: Preserving Food the Modern Way
I’ve included specific, detailed guidance on how to freeze dry all your foods properly.
I’ve covered all the things I wish I knew before buying a freeze dryer, like…
- Why you should be freeze drying
- How to choose the right freeze dryer
- How to set up your freeze dryer
- How much it actually costs to run a freeze dryer
- How to maintain your freeze dryer
- What other equipment you really need (or don’t)
- Which foods you can freeze dry
- Which foods you cannot freeze dry
- Food safety with freeze drying
- How to rehydrate your freeze dried foods
Is learning easier when you have video visuals to guide you through the process step-by-step? Then, my Freeze Drying Masterclass has you covered!
These resources can be purchased separately or as companions, so whether you choose the book or the masterclass, you will receive all the information I wished I had when I first began my freeze drying journey.
Other Articles You May Enjoy
- What Foods Cannot Be Freeze Dried
- Chicken Bouillon Recipe (Dehydrator or Freeze Dryer Method)
- Freeze Dried Potatoes
- Freeze Dried Eggs
- Freeze Dried Ice Cream
- Freeze Dried Garlic
- Freeze Dried Tomatoes
- Freeze Dried Corn
- Freeze Dried Apples
- Freeze Dried Strawberries
- Freeze Dried Coffee
- Freeze Dried Dog Food
- Freeze Dried Meat
- Freeze Dried Chicken Pot Pie


